Photographing Group Portraits
With the holidays coming up, you will likely get more opportunities to do a group portrait. From family or corporate Christmas cards to the mini wedding rush after the New Year, winter can fill your camera frame chock full of people.
A good group shoot can be loads of fun. But there are many challenges to be had as well. A group session gone bad can quickly become unmanageable. Here are a few tips to make sure your group session goes smoothly.
The Gathering
If you know the people in your group shot, then you are already ahead of the game because you know the social hierarchy and the trouble-makers in the group, if any.
If you don’t know the group that you are working with, try to find out as much as possible beforehand. The purpose of the portrait, the nature of the group, and the players involved are among the essential bits of information that can help you craft the proper tone of the portrait
Interacting with the Group
This is your shoot and you need to convey that to your audience. This doesn’t mean barking orders or treating everyone like children. Be warm, be sincere and make your statements declarative. The main thing to remember is to convey confidence in what you are doing.
Planning out and visualizing the session beforehand will go a long way toward giving you the attitude and resulting body language that will make it more likely for others to assume you know what you are doing.
If you are just starting out, a certain amount of uncertainty is going to happen. In this case, you’re best option is to make friends with your anxiety. Become at ease with uneasiness.
If social interactions are a point of concern for you regarding your ability to properly function as a portrait photographer, I highly recommend reading The Charisma Myth by Olivia Fox Cabane for good actionable information on the subject.
Camera Settings
Start with the trusty 50mm and work your way wider if necessary. The larger the group, the wider angle lens you will need. It doesn’t have to be a particularly fast lens like an f1.8, because you are likely going to want at least an aperture of f8 to keep all the faces sharp and in focus.
You can reduce the need for a higher shutter speed by using a tripod and/or a remote shutter release, but you will not want to go below 1/60th of a second anyway or your subject’s movements will blur their faces.
Lighting the Group
Keeping your aperture at f8 or higher and your ISO under 400 (or 1600 depending on your camera) is going to mean that you will need a lot of light. Lighting a group can be one of the trickiest scenarios in portraiture. If at all possible, get a boost from natural light as well as artificial.
If you have low ceilings that are a light color, consider yourself lucky and bounce your lights off the ceiling. If not, try to get the lights positioned as high as possible. Even an unobstructed face can be made invisible within the shadows of the flash.
A critical consideration is to have your lighting set up and exposures tested before the session. If you need to change lighting configurations during the shoot, you should consider an assistant essential to the shoot.
Posing the Group
You will want to position key players either in the center or at the edges of a traditional group photo. Don’t let them get lost in the crowd.
If you have lots of rows and no high point from which to shoot, try to put the tallest people in the back row and shorter people in front.
A variation on that method is having the front or middle rows seated. If possible, have the front row kneel in front of the seated row. This lends itself to sports images more than others. With inside sports, you can sometimes even get a row of people lying down on their sides or stomachs.
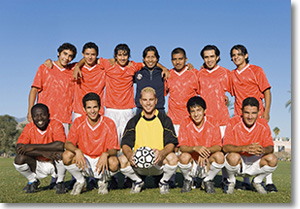
Try to keep heads at uneven heights for more dynamic photos. A straight line of people is boring. This is also easier for smaller groups. And get them closer, particularly with friend or family.
By far, the most important thing about posing a group is to make sure everyone is unobstructed by anyone or anything else.
The Shoot
Take lots of shots of the same moment. This can be a godsend during post production. Invariably, someone will be blinking, moving too fast, talking or have an otherwise weird look on their face in every single picture you take of the group.
Take at least three images from each perspective. If I think I can get away with it, I’ll go for four. For some reason “five” is the tipping point for potential protests from the subjects. If you feel you need more images from the same spot, don’t add them into the count beyond four. Two bursts of three images are better than one burst of six images.
Change your perspective often. This may not be as doable in a large group, but it can be a lifesaver for smaller groups.
Getting up into a higher position can greatly improve the visibility of each person if there are multiple rows. Often a stepladder will suffice for this purpose.

Let them know you are about the take three pictures and not to move until after the third flash. Then count them out. Try to keep the count rhythmic and people will respond more.
This is another good reason to use a tripod because your perspective won’t change and you can just swap heads between the bad and good captures with a Lasso Tool in Photoshop.
Post Production
Swapping heads in Photoshop is an essential skill for any portrait photographer. Luckily, it’s pretty easy. This technique assumes that the images were taken from a tripod and no perspective adjustments will need to be made.
First, select the Lasso Tool (L) from the Tools Palette (Window>Tools). In these cases, I usually set the feather to about 3 to 10 pixels depending on the size of the image.
With the source image and the destination image opened, select the source image and loosely encircle the head of your subject down to the shoulders.
Press Ctrl+C to copy the selection, go to the destination image and press Ctrl+V to paste the image.
Select the Move Tool (V) and drag the good pose over the bad pose. You may need to use the four-way arrow keys to nudge the pasted image into its best position.
Then use a layer mask with a soft-edged black brush or go to the Eraser Tool (E) and select a brush with a soft edge to remove any extra pixels.
Stay updated with all our new releases and articles by signing up for our free email updates. We only send emails once a week to keep you updated and we NEVER spam or share your information.