Photoshop Tutorial: Layer Mask Basics

Have you ever used the Eraser Tool in Photoshop? Probably so. Along with the Brush and Pencil Tools, it's usually among the first tools we use when first learning to edit images.
What if I told you that there was a better way? A way to erase and then, if necessary, recover anything that you've erased. This is an example of non-destructive editing.
What is Non-Destructive Editing in Photoshop?
Non-destructive editing is a method used by professional photographers that ensures the original image is not altered or overwritten.
The advantage to this is that you can come back to the image and edit any adjustments you've made previously, even after you've saved and closed it.
In this case, the non-destructive editing technique we will be exploring here is the Layer Mask.
If you are unfamiliar with layers in Photoshop, check out our article Introduction to Layers.
What is a Layer Mask in Photoshop?
A layer mask is a way to reveal or hide portions of one layer in order to reveal or hide a separate layer below.
For example, if you have a digital background that you want to remove the original background and reveal behind a subject, you can apply a layer rather than using the Eraser Tool.
Layer Mask better than Eraser Tool?
Beginners at Photoshop tend to use the Eraser Tool because they know what it does simply from its name. And that is literally the only advantage the Eraser Tool has over a Layer Mask. By the time you have finished this tutorial, you should never need, or want to use the Eraser Tool again.
Basic Masking Concept
A layer mask that is black hides the pixels on the layer that it is masking. A white layer mask reveals the pixels.
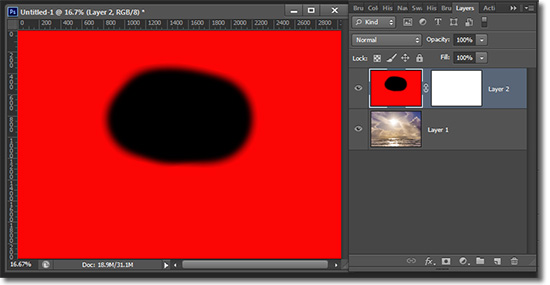
In the image below, I have placed a new layer filled with red. We can only see the solid red color in the image. But if you look in the Layers Window, you can see that there is an image below it that is not visible.
If you click on the New Layer Mask button in the Layers Window, you will see absolutely nothing happen because the mask is white which reveals the pixels of the layer it is on. If that mask was black, it would hide everything and you would only see the image below.
An easy way to remember is that white is like day and everything can be seen. Black is dark like night and hides the details.
A Layer Mask is Non-Destructive
Once you have erased a pixel, that pixel is gone. When you mask a pixel, you will always have the original image intact.
A Layer Mask is Editable
When you use an Eraser Tool, after you close that image, you can never recover what you have erased. Even if you haven’t closed the image, you will have to undo everything you’ve done since you last used the Eraser Tool.
With a layer mask, you can go back at any time and edit any part of the masked layer..
Editing a Layer Mask
In this example, we will use the previous image with the white mask. To reveal the image below, I will choose a black brush.

Make sure the mask is selected and not the image itself. If your image is selected, the image will be painted black (or the shade selected). To select the layer or the layer mask, simply click on them within the Layers Window.
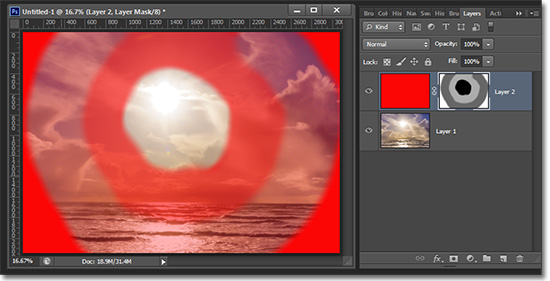
As you can see, painting the mask with black hides the red of the layer and reveals the image on the layer below.

Since white reveals and black hides, gray either half-reveals or half-hides, depending on your point of view.
Practical Application “Get Off the Pot”
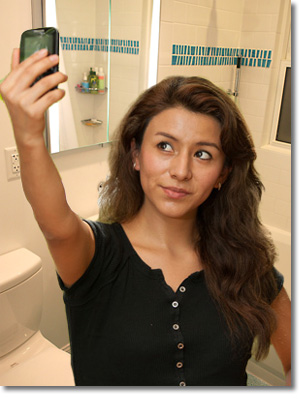
We will use a simple example that everyone can relate to. This is Beatrice. Beatrice evidently hasn’t got the word yet that selfies are a bit passé (or is that just my wishful thinking?).

Like most selfies, this one was taken in the bathroom complete with a toilet in the background. To her credit, though; she didn’t make a duck-face.
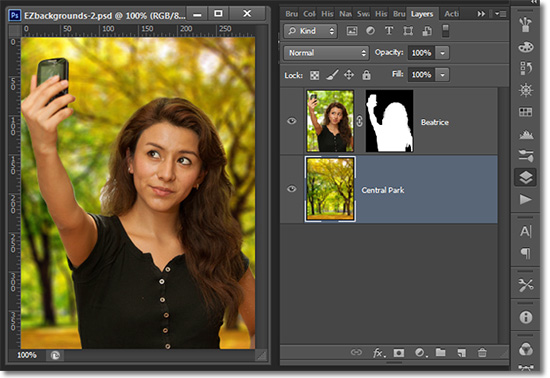
As a purveyor of backgrounds, we felt it our civic duty to at least put Beatrice into a better environment. I have chosen a spring theme from our library of digital backgrounds and placed it behind the lovely Beatrice’s self-portrait.

With just a few strategic black brush strokes on the mask, Beatrice is now enjoying a better life in the outdoors, hopefully with some friends that will take her picture for her.
This should not be considered a tutorial on using masks with digital backgrounds. Tutorials on that subject will be released soon. But this article is just to familiarize you with the concept and basic application of the layer masks in Photoshop.
Stay updated with all our new releases and articles by signing up for our free email updates. We only send emails once a week to keep you updated and we NEVER spam or share your information.
If you enjoyed this article, get email free updates
Article Takeaways
1. A white mask reveals the pixels of the layer to which it's applied..
2. A black mask hides the pixels of the layer to which it's applied.
3. Every shade of gray in between hides or reveals relative to its particular shade.
4. A mask works in place of the Eraser Tool nearly every time. You may never need to use an Eraser Tool again.


