The Best Noise Reduction Technique

It has happened to all of us at some point. You get the perfect picture. You know it. It looks good in the camera. It looks good when you open in on the computer screen. But then you zoom in to the image...
What is Noise?
For real-world purposes, noise is splotchy discolorations seen throughout an image. You can usually see noise in the shadows or solid-colored areas. Before the days of digital cameras, noise was more commonly referred to as “grain”.
In this tutorial, we will show you how to reduce noise without losing any detail at all stacking your images.
Under the right conditions, this is truly the best method for reducing noise short of buying a third-party program.
What’s Wrong With Noise?
Noise distorts an image’s tone and contrast. If you are intending to present your images on a professional level or for print, you will want to control noise as much as possible.
The image below shows what noise can look like when shadows are lightened.

What Causes Noise?
Noise can be caused by a number of factors. Long shutter speeds, high ISOs, dark areas or improperly exposed images can all cause noise to some degree. A small image sensor inside cheaper point-and-shoots or phones will also cause noise.
Most consumer -and prosumer-level cameras have chips that are decent at noise reduction. But even the best of sensors can’t overcome certain situations.
How To Avoid Noise
Avoiding noise is much preferred to fixing noise. A few seconds getting an image right “in-camera” will save you many minutes in post-production fixes.
Optimize Your Settings.
Noise is the reason we don’t just set our ISO to 6400 and leave it there. The higher the ISO, the more noise will be present in your image. Keep it as low as possible. Even with the advancements of sensors in today’s cameras, any image shot above ISO 400 should be inspected before printing.
Short shutter speeds will significantly decrease noise. The longer a sensor is exposed to light, the likely it is to go “off-track” and inaccurately record the proper color and brightness.
Image Stacking
The concept of stacking is as simple to understand as it is to apply. The noise that occurs in an image is mostly random. If you take a three or more different exposures of the same image, the noise will be different in each one. When you stack them on top of each other, the noise in one of the other stacked images will not likely be in the same location as the noise in any of the other images. The one constant is the image that you are capturing.
A sturdy tripod or other solid stabilizing base is essential. The camera cannot move even slightly while taking each of the exposures.
A wireless or cable shutter release is also needed to reduce vibration. If your camera has a delayed shutter and multiple exposure functions, you can make do without the remote shutter release.
Post Production
Open your images in Photoshop or your preferred image editing program. As long as the program you are using has layers, you will be able to perform this function.
Take one image and select the entire image going to Select>All (Ctrl+A), then copying the image by going to Edit>Copy (Ctrl+C). Click on one of the other images and go to Edit>Paste (Ctrl+V).
The pasted image should align perfectly with the image below. To test if this is true, reduce the opacity of the pasted layer. If no change occurs, then the layers are aligned.
Repeat this process for as many images as you have. Make sure you don’t repeat one of the images or it will not work properly.
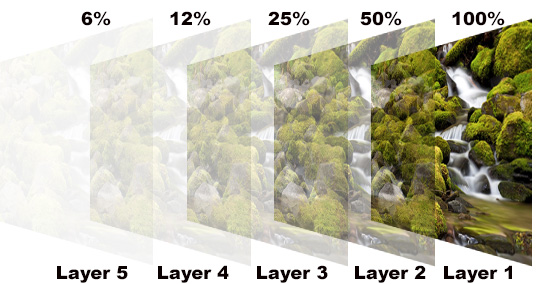
When you have all the layers stacked on each other, use the Navigator or the Zoom Tool to come in at 100% magnification. This is essential to accurately determining the effectiveness of this technique.
Keep the bottom layer at 100% opacity within the Layer Window. Make the next layer up 50% opacity, then next 25%, 12%, 6%, 3%, etc..

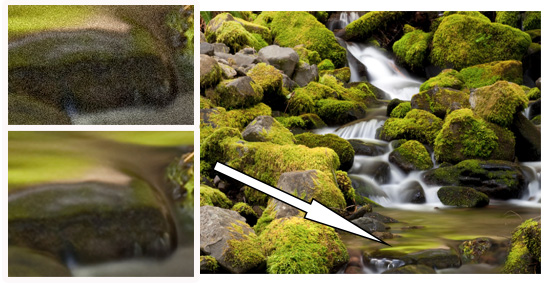
The effect will be dramatic. This is the single best noise reduction technique that retains the details of the image. All other methods are a trade-off between sharpness and noise.
Flatten the image and you are done. It’s as easy as that
What’s the catch?
For the purposes of this effect, this technique mostly works in still-life images. Although, as in our example of the waterfall, you can create some unusual effects if a portion of the image is moving.
Variations on image stacking can produce High Dynamic Range images, long depths of field, and other effects.
Stay updated with all our new releases and articles by signing up for our free email updates. We only send emails once a week to keep you updated and we NEVER spam or share your information. We’ve got that catchlight brush series and tutorials coming up as well.
If you enjoyed this article, get email free updates
Article Takeaways
1. Noise is best avoided in-camera.
2. High ISOs, long shutter speeds and underexposed photos are a few of the ways noise can enter your images.
3. Stacking images is creating multiple images shot while using a tripod and remote shutter release.
4. Stack all the images in layers in Photoshop.
5. Start with the bottom layer at 100% opacity and reduce each next layer by half.
6. Always be at 100% magnification when determining noise levels.