Create Your Own Photoshop Keyboard Shortcut in 30 Seconds or Less

Keyboard shortcuts in Photoshop are a major part of workflow reduction. Those little three-second time savers can add up to a minute or two on an average image. If you have fifty images to edit from a session, it could be up to an hour of savings. And, let’s be honest, when was the last time you only shot fifty images in a session?
If you’re like me, you learn a shortcut here and shortcut there until you eventually have a healthy quick-key arsenal at your fingertips. I have to admit that I’m about half keyboard shortcuts and half menu-clicking; mostly due to habit. But to watch one of our resident designers work an image, you would think they were typing a thesis with one hand.
So, we all see how useful the Photoshop keyboard shortcuts are for saving us time. But have you ever noticed that, once in a while, there is no keyboard shortcut listed next to the function in the menu. Well, it turns out that most of those already have a shortcut even if it isn’t listed; most for reasons of space availability.
But there are some functions out there that don’t have any keyboard shortcuts assigned them at all. For example, if you want to do a simple “Rotate 90 degrees clockwise” on an image, you have to go three steps deep into the menu each time you want to perform that simple command. Wouldn’t it be much easier to just press a button?
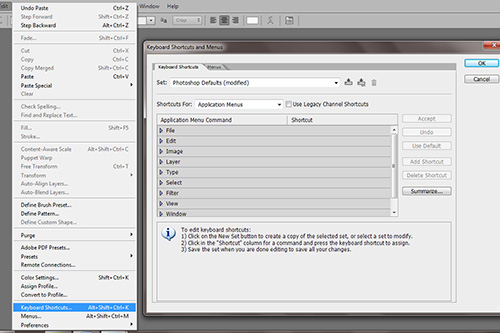
Well, Adobe thought the same thing. You can add your own customized keyboard shortcuts right from the menu. And, by coincidence, the keyboard shortcuts function has its own keyboard shortcut. It’s Alt+Shift+Ctrl+K for PC and Command+Option+Shift+K for Mac.
For our example, I will share my must-have shortcut: the Flatten Image function in the Layers Window (F7). If you are working with layers, you will probably need to flatten the image before final output, so it comes in handy a lot.

The menu location for keyboard shortcuts is “Edit>Keyboard Shortcuts… “. Once there, you are presented with nearly the entire Photoshop menu listed in the same order they appear on the menu bar along with subcategories.
Find the Flatten Image function near the end of the list in the Layers category. Click on it and select your desired shortcut. I pick Shift+Ctrl+Alt+Z because they are the closest cluster of keys to where my left hand rests while editing. But you can pick anything.
If your chosen shortcut key is already taken by another function in Photoshop, the all-too-familiar little yield sign with a question mark will let you know. You can choose to override it and lose the shortcuts previous function or you can select a different key combination.
Click “accept” and there you have it. You’ve created your own customized Photoshop keyboard shortcut. They are easy to remember too since you created them yourself.
Stay updated by signing up for our free updates on new releases and articles. Remember, we don’t spam and don’t share your information with anyone.
If you enjoyed this article, get email free updates
Three really cool things not mentioned
1. You can create an html file of your customized shortcuts. Click on the Summarize button and voila! You’ve got a reference file for all your functions.
2.You can export your keyboard shortcuts to Adobe Elements which doesn’t technically have customizable keyboard shortcuts. Even cooler, our next article will show you how to create custom keyboard shortcuts in Photoshop Elements.
3. Look at the top of the Keyboard Shortcut dialog box. You see that tab that says “menu”? You can customize your menu and never accidently open Bridge again. We’ll show you how to do that pretty soon too.


