Adjustment Layers in Photoshop

Whenever possible, you should always strive to be non-destructive. This works as well in Photoshop as it does in real life.
Destructive editing means that you are making changes directly to the pixels in your image. This means that if you want to change your edits later that you will have to undo everything you did between the desired point of change and point at which the change was made. And this is only if you haven’t saved and closed the file. After that, it’s all over.
The term “non-destructive” simply means applying changes or edits without altering the original image. Instead of an edit being a step along the way, it is an independent adjustment that can be accessed at any point in the entire process.
Another advantage to using adjustment layers is that they come with their own ready-made masks. This means that if you want to make changes to a selected portion of your image, you don’t have to create a mask because one is already there waiting for you.
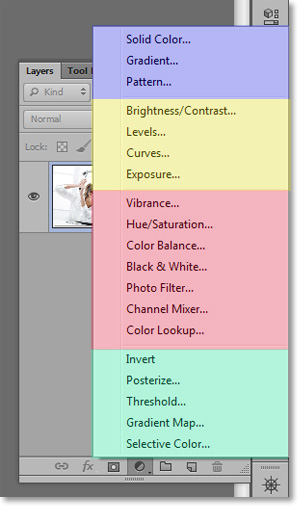
List of Adjustment Layers
It’s a little difficult to notice, but the nineteen adjustment layers are separated into four different categories.
Fill Adjustment Layers

The first three; Solid Color, Gradient and Pattern are fill adjustments. They all fill a layer with their respective description.
Tone Adjustment Layers

The next four; Brightness/Contrast, Levels, Curves and Exposure are brightness adjustments. Beginners will likely gravitate to the Brightness/Contrast and the Exposure adjustments. The next level would be… well, Levels. But a true Photoshop master will go straight to the Curves. You can do everything in Curves and more that you can do in any of the other tonal adjustments.
Color Adjustment Layers
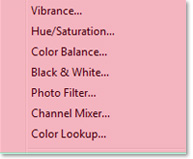
The next seven; Vibrance, Hue/Saturation, Color Balance, Black and White, Photo Filter, Channel Mixer and Color Lookup are the color adjustments. This category contains what is probably the most useful mix of adjustments. I use all of these to one degree or another depending on the assignment.
Effects Adjustment Layers
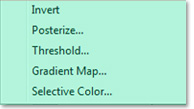
Last and maybe least are the final five; Invert, Posterize, Threshold, Gradient Map and Selective Color which I suppose could best be described as effects adjustments.
Honestly, if that last group were gone from the list, I wouldn’t miss them. In fact, it makes me wonder why those were included when other obvious choices are missing like Dodge and Burn.
But, as the old Spanish expression goes, “Para los gustos, los colores”, which essentially means “for every color, there is a different taste”. So, I’m sure there’s someone out there that uses Posterize religiously… it’s just not me.
Universal Editing Traits of Adjustment Layers
Some basic editing of the adjustment layers is common among them all. For instacne, you can access them all by clicking on the black-and-white circle at the bottom of the Layer Window. When a new adjustment layer is created, you will be greeted with that particular adjustment layer's dialog box.
In all but the Fill adjustment layers, you will have the option of editing within the properties window of the adjustment you are using or to toggle to the Mask properties window.
The icons along the bottom of the Properties windows represent clipping, previous state, reset, visibility and delete. The last three are self-explanatory, but the first two deserve some expanded description.
Clipping Layers
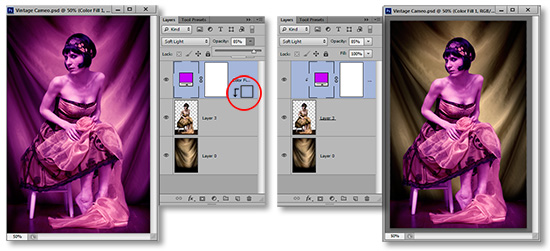
An adjustment layer will affect every layer beneath it. The layers above will remain unaffected. But what if you want the adjustment to be applied to only one particular layer? This is where clipping comes in handy.
To apply an adjustment layer to the single layer below it, press the Alt key (Option on Mac) and place your cursor between the layers until you see a line between the layers highlight and a clippling icon. The icon is as shown in the red circle below.
Here is an exaggerated image to illustrate the effect. The image on the left is an adjustment layer applied to all the layers below it. The image on the right is applied only to the single layer to which it is clipped.
Previous State
The next icon in line is an eye with a curved arrow next to it. Pressing and holding this icon will show you the original state of the image before your changes have been applied. Releasing will reinstate the image to its edited state.
Editing Later
As stated, the advantage of non-destructive editing is the ability to come back at any point and make changes without affecting other edits. To recall any adjustment layer's editing dialog box, you can double-click over the effect's icon within the layer itself. You can also call-up the mask's editor by doing the same over the mask icon.
That’s it for the basic concepts of Adjustment Layers. Now don’t feel cheated. We are going to cover the whens, whys and hows of it all. But one must understand the basic concept first.
We will be covering adjustment layers for the next couple of weeks, starting with the first four fill adjustments and how to apply them in your day-to-day editing. Stay updated by signing up below for our weekly newsletter. Or if you would like to give me a piece of your mind for dissing the Posterize Adjustment Layer, you can leave it in the comments below.
Stay updated with all our new releases and articles by signing up for our free email updates. We only send emails once a week to keep you updated and we NEVER spam or share your information. We’ve got that catchlight brush series and tutorials coming up as well.
If you enjoyed this article, get email free updates
Article Takeaways
1. Always aspire to non-destructive editing.
2. Non-destructive editing leaves the original image intact so you can go back at any point and make changes.
