Why You Need to Know Smart Objects
You may think you’re doing just fine without smart objects. It took me years to warm up to them. It could have been the name “objects”. It sounds like programmer language or something used in 3D. Smart “layers” would have been more intuitive. Whatever they are called, once you understand them, you won’t want to go back.
Why Would I Use Smart Objects?
Once understood, the better question is, “Why would I not use smart objects?”
The main advantage of smart objects is that they can be transformed indefinitely without losing quality. Regular objects will lose all their previous information with every edit.
Smart Objects essential make your edits non-destructive. Smart objects retain the original information of the file. A good way to think about it is a smart object is a file within a file. Whatever edits you make to a smart object, the original file is always there waiting to be used again.
For example, the two objects below are the same exact objects. I duplicated the one object and converted it to a smart object. Then I scaled both of them down to the same small size. After that, I rescaled them back up to their original size.
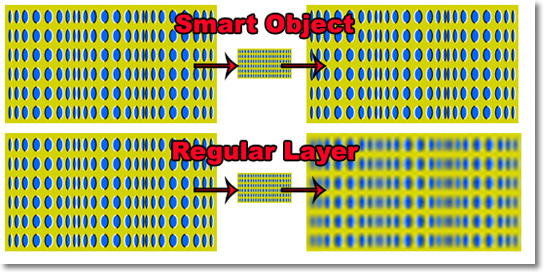
Notice the significant degradation of the non-smart object. When it was downsized, it lost all of its previous information and now only contains the information from its reduced size. So when it is resized upward, it has no memory of its previous state.
Another advantage is that any filters applied to the object are automatically Smart Filters when the object to which they are being applied is a smart object. Smart filters are the same non-destructive way of editing. In other words, any smart filter applied to an object can be reversed without undoing other edits.
Smart filters can be applied to non-smart objects by going to Filter>Convert to Smart Filter. But it’s just a different way of doing the same thing since applying a smart filter turns the object into a smart object.
When a smart filter is applied, it will appear in the Layers Window as a separate linked layer. You can go click on that smart filter layer and re-edit various components of the filter as well.
How to Create Smart Objects
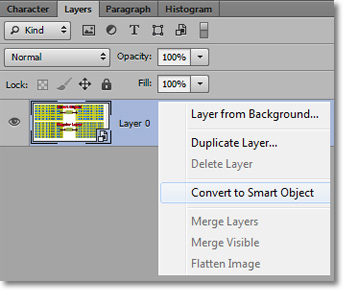
It’s as simple as it gets to turn an object into a smart object, place your cursor over the relevant layer and right-click and select “Convert to Smart Object” or you can go the menu and select Layer>Convert to Smart Object. You will know that the object in the layer has been converted by the icon at the lower-right of the thumbnail window.
You can also convert a group of layers into a single smart object much like you would a single object. Select each of the layers that you wish to be turned into a smart layer and right-click to select “Convert to Smart Object”.
You can also create a smart object from a vector image made in Illustrator by going to Image>Place. This will open up a dialog window which you can direct to your AI file. Then you will be able to edit the vector file in Photoshop. For added versatility, you can actually use Illustrator and Photoshop in conjunction with each other by editing the source file for the smart object within Illustrator and the results will appear in Photoshop.
You can also duplicate an existing smart object by pressing Ctrl+J as you would with any layer.
Editing Smart Objects
To edit a smart object, either double-click over the smart object thumbnail or right-click over the thumbnail and select “Edit Smart Object”. You will be met with a prompt letting you know that you have to save the object before any changes will take effect. From there you will be presented with a separate smart object to edit.
Worth noting is the fact that if you have a smart object that you have duplicated, any editing done to the smart object will affect all of the duplicated smart objects as well as the original smart object. This is because each duplicated smart object is reading from the same source file. This is a definite plus, but can also be a drawback in certain situations. To avoid this characteristic, duplicate the smart object via copying which can be done by left-clicking and selecting “Copy Smart Object via Layer” when creating a duplicate smart object.
Replacing, Exporting and Rasterizing Smart Objects
These three final functions are clustered close to each other in the drop-down menu when you left-click over the smart object layer. Replacing smart objects will also replace any other linked objects as well.
To rasterize means simply to bring it back to its non-smart form.
Stay updated with all our new releases and articles by signing up for our free email updates. We only send emails once a week to keep you updated and we NEVER spam or share your information.