3 Essential Photoshop Blending Modes
So far, we've covered Layers in Photoshop and Layer Masks in Photoshop. The next step is to understand how layers interact with each other.
The staff at Adobe has seen fit to supply up to 30 different blend modes on the latest version of Photoshop. But, as it turns out, you only really need to know a few for 99% of your blending needs.
Basic Blend Mode Categories
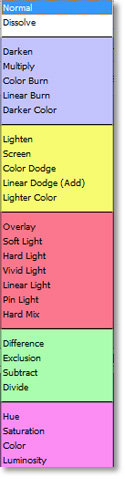
Although there are numerous blending modes available within the Layers Window, they can be separated into five basic categories. The following list is from the most recent CC version of Photoshop.
Uncategorized- Normal, Dissolve, Behind, Clear (last two not shown)
Darkening Category- Darken, Multiply, Color Burn, Linear Burn, Darken Color
Lightening Category- Lighten, Screen, Color Dodge, Liner Dodge (Add), Lighter Color
Contrasting Category- Overlay, Soft Light, Hard Light, Vivid Light, Linear Light, Pin Light, Hard Mix
Comparative Category- Difference, Exclusion, Subtract, Divide
Compositing Category- Hue, Saturation, Color, Luminosity
There is no need to be overwhelmed by the number of blend modes. You will not be tested on this and you will likely never use most of them.
But What About…?
So, why are we concentrating on only three blend modes out of 30 different modes? At this point, we need only concentrate on the most useful. In no particular order, those would be the Multiply, Screen and Overlay Modes.
In all the years I’ve been using Photoshop, I’ve never had a use for Dissolve. I don’t ever recall using the Comparative Category either. I have used Color and Luminosity to a degree in the Compositing Category, which are likely a distant second to the big three blending modes.
That is not to say the other modes are useless. They have their purpose. But I can say with certainty that I have used each of these three blending modes more than all the others combined. Of course, this is not true for everyone. But with few exceptions; Multiply, Screen and Overlay are among the most used for the majority of image editors.
The Big Three
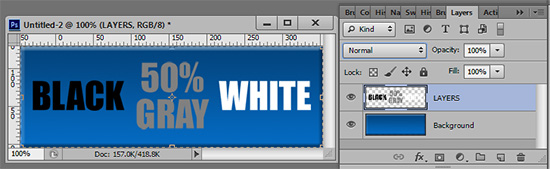
We will use the shades of white, black and 50% gray because those are the elements of each particular blend mode that have the most visible effect. 50% gray is the mid-point between black and white. This is our example image at Normal blending mode.
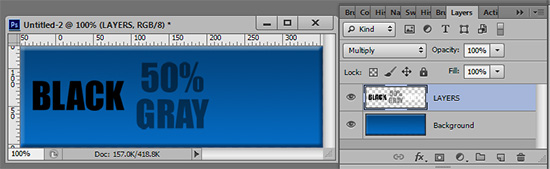
Multiply
Multiply blending mode excludes white, darkens 50% gray and retains black.
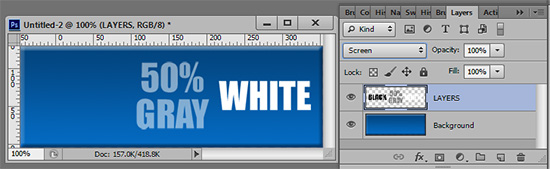
Screen
Screen blending mode excludes black, lightens 50% gray and retains white.
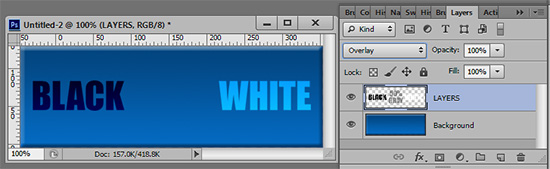
Overlay
Overlay blending mode excludes 50% gray, darkens blacks and lightens whites.
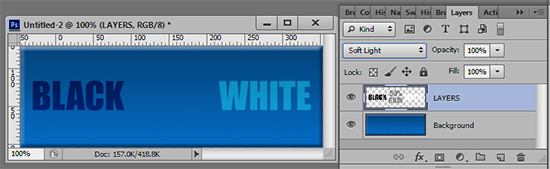
Soft Light
I know, I know. I said only three blending modes. But this one is just a more subtle version of Overlay. If using the Overlay blending mode is too intense, I usually go for the Soft Light mode.
Everyday Uses
Multiply
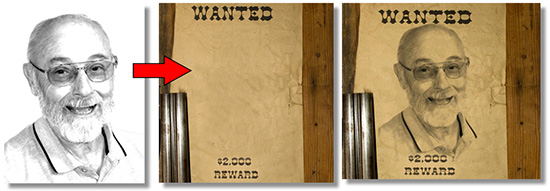
This is good for a general darkening of your image. Use the Opacity slider to control the intensity of the effect. The Multiply mode will eliminate the white as in this example of an image turned into a sketch.
You can view our free Photoshop video tutorial on the subject at Photoshop Pencil Sketch Technique.
Screen
At the risk of repeating myself, this blend mode is good for general lightening of an image. The same method of reducing the Opacity will decrease the intensity of the effect. Since it makes black disappear, it can be useful tasks such as adding fireworks or lightning to a scenic image as shown in the image below.
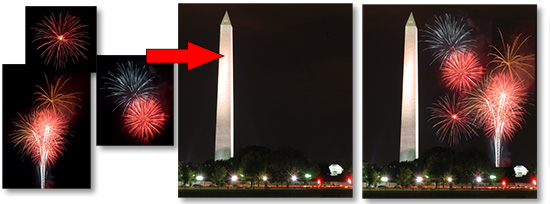
View a free video tutorial on how to do this at Adding Fireworks to an Image.
Overlay and Soft Light
These two modes increase contrast. This can be useful in a number of ways. The most practical usage is using these modes for non-destructive dodging and burning.
Dodging and burning are simply different ways of saying lightening and darkening. There are tools for this in the Tool Palette, but they will alter the pixels of your image and are non-reversible.
With an Overlay or Soft Light blending mode with a 50% gray fill, you can darken and lighten selected points in your image by painting black to darken or white to lighten. All shades in between will have a relative effect to their shading.
Look at the image below and the markings on the mask to see their effect. Notice the lighter gray of the dodge and burn layer in the foreground and the darker gray of the sky.

Stay updated with all our new releases and articles by signing up for our free email updates. We only send emails once a week to keep you updated and we NEVER spam or share your information. We’ve got that catchlight brush series and tutorials coming up as well.
If you enjoyed this article, get email free updates
Article Takeaways
1. There are five basic categories of blending modes.
2. Within those five categories are three that you will use more than any others; Multiply, Screen and Overlay
3. Multiply blending mode darkens and makes white invisible.
4. Screen blending mode lightens and makes black invisible.
5. Overlay enhances contrast and makes 50% gray invisible.