Fill Adjustment Layers in Photoshop
In our last article, we looked at the basic function of Adjustment Layers. Now, and for the next four articles, we will be expanding on the specific adjustment layers.
Few things could be described as destructive editing than a fill, except maybe an outright erasure of pixels. That is why the fill adjustments are collectively some of the most used adjustment layers available.
Solid-Color Adjustment Layer
The Solid-Color fill adjustment tool is essentially the non-destructive equivalent of the Paint Bucket Tool. It fills the entire layer or a selected area of the layer with a single color.
To activate the Solid-Color adjustment layer, click the half-white, half-black circle at the bottom of the Layers Window (1). A new layer will appear filled entirely with the foreground layer as it appears in the Tools palette.
You could choose your color from the foreground color swatch (2) by double-clicking on it. But the Color Picker (3) will also appear automatically when the new layer is formed.
To change the color, you can recall the Color Picker at any time by double clicking over the adjustment icon within the layer itself.
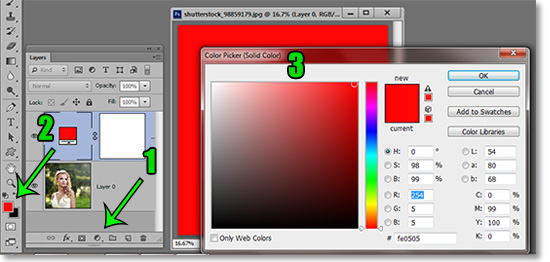
At first, it will just be a solid color over whatever layers are beneath it. The fill will have no affect on the layers above it.
To change its appearance in relation to the layers below, you will need to create different blending modes or adjust its opacity from the default Normal blending mode.
For detailed information on the different blending modes, take a look at our article on Blending Mode Basics.
When you are finished with your work, you can now save it as a layered psd file. You will then be able to go back and change your edit at any time without changing the original image or any other edits you may have performed.
Gradient Adjustment Layers
The Gradient adjustment is conceptually the same as the Solid-Color adjustment, except that it fills the layer with more than one color as defined by you.
Instead of a Color Picker when filling with a single color, you will see the Gradient Fill editing window. From there you can click on the drop-down menu and select from numerous gradient presets.
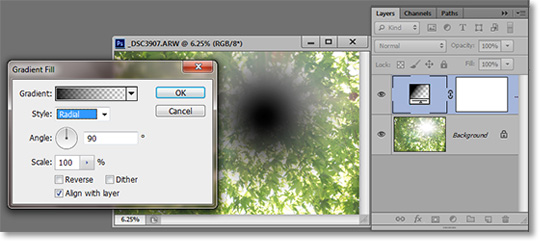
You can also change the style, angle and scale of the gradient as well as Reverse, Dither or Align with Layers from the same dialog box.
Create your own gradient by clicking directly over the gradient icon which brings up the Gradient editor itself.
You will also need to utilize blending modes and/or opacity adjustment to affect changes with layers underneath the adjustment layers.
Pattern Adjustment Layers
This is probably my least used of the three fill layers outlined here. I generally prefer to use separate textures that I’ve acquired to using the patterns included with Photoshop. This adjustment is not without its uses, though.
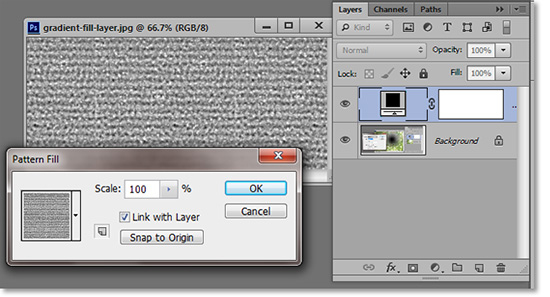
When the Patterns dialog box appears after you have created the adjustment layer, your cursor becomes a Move Tool. Place your cursor over the layer and hold to move the pattern as needed. If you don’t like your adjustment, you can click the “Snap to Origin” button. You can also adjust the scale of the pattern.
There is a large selection of patterns available which can be made visible by clicking at the top-right of the patterns dialog window. You can replace or append the existing list of patterns.
Those are the basic operations of the fill adjustment layers. In our next article, we will examine the adjustment layers used when trying to change brightness, contrast and exposure.
Stay updated with all our new releases and articles by signing up for our free email updates. We only send emails once a week to keep you updated and we NEVER spam or share your information. We’ve got that catchlight brush series and tutorials coming up as well.
