59 EZTips & Tricks for Photoshop

We are starting a new feature here at EZbackgrounds. Throughout the week, we will have a new EZTips for Photoshop, Lightroom, or portrait photography in general.
We’ll start off the series with the ten most useful tips for Photoshop as determined by our staff. These aren’t the “Wow” effects. These are the time-savers that ease your journey from shooting to showing off.
We hope you enjoy this and future tips to come.
1. Commit these 10 essential keyboard shortcuts to memory.
- New = Ctrl+N
- Open = Ctrl+O
- Select All = Ctrl+A
- Copy = Ctrl+C
- Paste = Ctrl+V
- Undo = Ctrl+Z
- Continue Undo = Alt+Ctrl+Z
- Save = Ctrl+S
- Print = Ctrl+P
- Close = Ctrl+W
- Exit = Ctrl+Q
2. Apple Users Only: Know these PC-to-Mac keyboard equivalents.
- Ctrl = Command
- Alt = Option
- Backspace = Delete
- Right Click = Control+Click
- Left Click = Click
3. Set your cursors to Brush Size and Precise.
Press Ctrl+K to bring up the Preferences dialog box. Go to Cursors and, in the Painting Cursors area, select either Normal Brush Tip or Full Brush Tip. The difference is if you are using a soft brush, the Full-Size Tip will show the entire edge up to the softness. The Normal-Size Tip will show the core size of the brush.

Set the Other Cursors to Precise for more accurate adjustments with tools.
As a bonus tip, I recommend changing your Units of Measurement to pixels instead of inches in the Units and Rulers category.
4. Use Layer Masks and never erase again.
When you erase something, it’s gone forever. When you mask something, it will always be there for you. Take a quick look at our Masking Basics article for more.
5. Copy and Paste Layer Styles.
If you need to put a drop-shadow on a couple dozen images with the same settings, you can right-click over the styled layer and select Copy Layer Style, the place your cursor over a layer that is not styled or improperly styled and right-click to select Paste Layer Style.
Do this to multiple layers by clicking Layer 1 (for example), then press the Shift key and click on Layer 10 (for example) and all the layers in between will be selected to paste the layer style. To choose multiple layers selectively, press the Ctrl key while clicking on each layer.
A keyboard shortcut is to press the Alt key and place your cursor over the fx icon in the effect to be copied, click and drag to the target layer and your style will be copied.
6. Easily align elements within an image.
If you have several layers and you want two or more elements to align in a particular way, Photoshop has an easy way to make that happen.
Go to the Move Tool (V) and make sure your Options are visible (Window>Options). Select any two or more layers and click on one of the alignment modes within the Options Palette.

7. Auto-Select Layers.
If you work with large amounts of layers, this is one of the most beneficial tool options for saving time and frustration. Over the years, I have spent hundreds of hours trying to find a single layer among dozens.
Within the options of the Move Tool is a selection box entitled Auto-Select. This means that you can visually click over any element and you will automatically select that particular layer without having to find it in the Layers Window.
The catch is that this feature is only on CS6 and later.
8. Press the Shift key when making adjustments to maintain proportions.
Nothing screams amateur like an image out of proportion. An experienced eye can spot it right away. It’s automatic for me to press the Shift key when adjusting scale. Press the Alt key also and the opposite edit point will adjust in conjunction with the edit point upon which you are adjusting. And, while in Free Transform (Ctrl+T), if the Ctrl key is pressed, it turns into the Distort Transformation.
9. Draw a perfectly straight line with your Brush or Eraser Tool.
Using your brush tool, click once and move to another point in the image. Press and hold the Shift key, then click again and you will create a straight line between those two points. A variation on this technique is pressing and holding the Shift key before you click the mouse to draw. This will create a straight line horizontally or vertically.
10. Adjust Brush Size and Hardness on the Fly
You may know about the bracket keys, [ and ], that will increase and decrease the size of your brush, but did you know that if you press the Shift key while using the bracket keys that you will be adjusting the hardness of the brush in 25% increments.
11. Discover the Reset button.
What if you went a little overboard on the Liquify Filter and want to start over?
In the Liquify Filter and any dialog box that has a "Cancel" button, you can instantly turn it into a "Reset" button by pressing the Alt key and clicking on it. Your image will be reset to the original settings when you open the filter or function.
12. Fast Fill
Easily fill a layer or selected portion of a layer by pressing one of these keyboard shortcuts.
- Ctrl+Backspace = Fill with background color
- Alt+Backspace = Fill with foreground color
- Press Shift with the above keys to fill non-transparent areas
- Shift+Backspace opens the Fill Dialog Box
13. Spacebar makes Hand Tool
While on any tool, you can change to the Hand Tool on the fly by pressing the spacebar.
14. Out-of-Bounds Eyedropper
You can use the Eyedropper Tool outside the bounds of Photoshop. Minimize your Photoshop window and place your cursor anywhere on the screen to capture the desired Color.
15. Create Selection from Layer
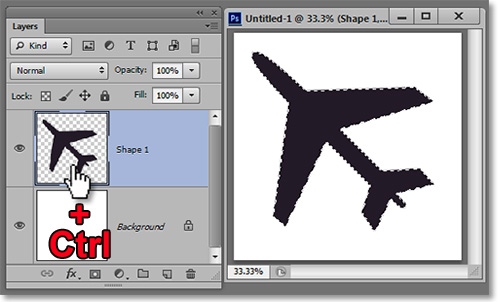
Place your cursor over a icon area of any particular layer in the Layers Window. Press the Ctrl key and click to create a selection of that layer's contents only.
16. No Need to Copy
If you are cutting a selection or text using Ctrl+X, you don't need to copy (Ctrl+C). Cutting automatically copies your objects, so you can just cut and paste without ever taking your finger off the Ctrl key. A step saved is a step earned in Photoshop.
Also, if you have a selection created that you want to copy and paste onto a new layer, just press Ctrl+J and you save yet another step. The selected area will appear in a new layer. Without a selection, this shortcut simply duplicates the entire layer.
17. High Pass Sharpen
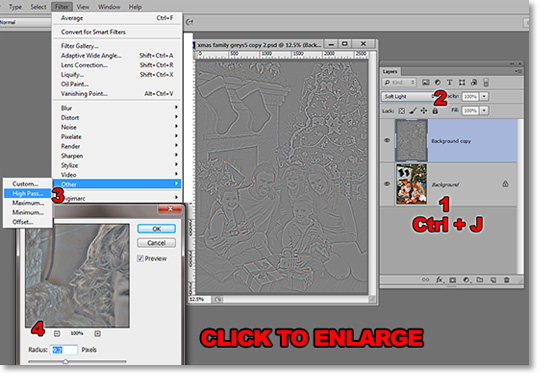
A great way to sharpen in a nondestructive way and it's super easy. Duplicate your subject's layer by pressing Ctrl+J (1), change the layer blending mode to Soft Light (2), then go to Filter>Other High Pass (3). Drag the slider enough to where the image looks like an outline of itself in the High Pass Window (4). Click the eye next to the edited layer to turn the layer off and on to see the effect. If you need more intensification, add contrast to the previously adjusted layer.
18. Non-Destructive Dodge & Burn
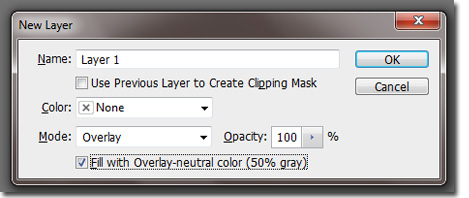
If you read our article on Blending Modes, you've already seen this one. Press Shift+Ctrl+N for a new layer. From the Mode drop-down menu, select Overlay and check the box entitled "Fill with Overlay-neutral color (50% gray). Now paint using the Brush Tool on the newly created Blending Layer. Black to darken and white to lighten or shades of gray for relative effects. You can use Soft Light mode instead of Overlay for a more subtle effect.
19. Scroll Through Blending Modes
You can scroll through each of the blending modes by highlighting the blending layer. Press the Shift key and go up the list with the + key, go down the list with the - key. This only works with a 10-key number pad. If your computer doesn't have one, you can substitute the up and down arrow keys
20. Make All Layers Invisible
Sometimes when you are working on a particular layer, it would be nice if you could make everything else disappear temporarily to focus better. This can be done by pressing the Alt key while clicking on the eye icon next to the layer that you are working on. This will make all the rest of the layers invisible. You can bring them all back the same way (except the layers that were invisible to begin with).
21. Quick copy and paste of masks
Often you will need a mask to apply to more than one layer. Simply place your cursor over the mask in the Layers Window, left-click and hold, press the Alt key and drag the mask to the desired layer where the mask will be duplicated.
22. Scroll Through Fonts
To see how each font looks in your image, double-click on the font layer icon and click on the font list in the Option Bar. Use the up and down arrows to quickly scroll through each font.
23. Open a Screen Shot in Photoshop
On your PC keyboard, there is a key that is usually located in the upper right somewhere that reads "Print Screen" or "PRTSC". When you have an image on your computer screen, you can press that button and your computer will take a picture of whatever is visible. With Photoshop open, create a new image document (Ctrl+N). The dimensions should already read the same as your computer screen. Once the image is open paste the image (Ctrl+V) and you should be able to see your entire computer screen. The Mac equivalent is Apple Key + Shift + 3.
24. One Button Dodge & Burn Switch
When you are using either the dodge or burn tools, you can switch to the other on the fly by pressing the Alt key. The settings will be exactly the same for the switched tools as the original tool. However, there is no indication that the switch has occurred other than in the History Window and, of course, the resulting effect itself.
25. Quickly Add Catchlights in the Eyes
Eyes without catchlights look dead. Catchlights add life. Create a blank new layer over your subject layer. Select white in the foreground color picker in the Tools Palette. Select a hard-edged brush and click once over the appropriate area of each eye.
Catchlights look best between 11 and 1 o'clock positions. One catchlight is optimum. Maybe a second smaller catchlight will work as well, but multiple catchlights will give a sense of folly to your subject. You may want to do a 1 or 2 pixel Gaussian Blur and/or adjust the layer opacity down a little to enhance realism.
Something to keep in mind is that once you become aware of the catchlights in the eyes, they tend to look out of place and conspicuous. I recommend walking away and coming back later or showing the image to a third party for confirmation of realism.
26. Movable Horizontal and Vertical Guides
Activate the rulers at the edge of your image window by going to View>Rulers (Ctrl+R). Place your cursor in the empty space at the top-left of the image window where the horizontal and vertical rulers meet. Left-click and hold, then drag down and right. A vertical and horizontal guide will follow your cursor.
For example, if you place those guides over the top and left edges of a circle, your circular selection will fit perfectly around the circle to be selected. See number 8 to maintain proportions.
27. Choose Color on the Fly
With your cursor placed anywhere over your open image press Shift+Alt+Right Click and a basic Color Picker will appear.
28. Tricks With Text
Increase or decrease the spacing between individual letters by pressing the Alt key and then, while your cursor is between the two letters, press the left-arrow or righ-arrow keys (of the four-way arrow keys, not the < or > keys) to bring the characters closer together or farther apart. Press Ctrl+Alt to create the same results in larger increments.
29. Tricks With Text 2
Change the size of your font on the fly. While your text is fully selected, press the Shift+Ctrl keys and then press either the '<' or '>' keys (not the four-way arrow keys) to decrease or increase the size of your font. Press Shift+Ctrl+Alt for larger size increments.
30. Color Schemes at your Fingertips
Create your own color schemes or choose from thousands of user contributed schemes within Photoshop. Go to Window>Extensions>Kuler and find a whole new world of possibilities. If you don't have CS5 or later, you can still go to their website. Never labor over color schemes again.
31. Paste into Same Place
For some reason, the default setting for pasting a copied selection is to place it in the center of the image. However, more often than not, the paste is best placed exactly in the position within the image that it was when selected. To keep your pastes in place, simply add the shift key to the normal Ctrl+v paste (Shift+Ctrl+V) and your selection will not move when pasted.
32. Styles On Their Own Layer
For a number of reasons, having a layer style on its own layer can be useful. To do this, duplicate your selection or entire layer by pressing Crtl+J and reduce the Fill slider to "0", then apply the style. The Fill slider is located just below the Opacity slider.
33. Expose Hiding Pixels
When erasing around the edges of a subject, sometimes we miss a few pixels here and there that we can't see. Use the Stroke style in the Layers Palette (or Layer>Layer Style>Stroke...) and expose all those rogue pixels to be easily erased.
34. Take the Photoshop Portrait Exposure Test
A quick way to test whether your exposure is correct in a portrait is to use the Eyedropper Tool (I) in Photoshop. Bring up the Information Window (Window>Info) and place your Eyedropper cursor over the area of your subject's face that has the most highlights (usually nose, cheek or forehead). Look at the "R" in the RGB display (we'ere assuming an RGB color profile). The R should optimally read no higher than "240" and no lower than "236" when placed over the brightest of the pixels.
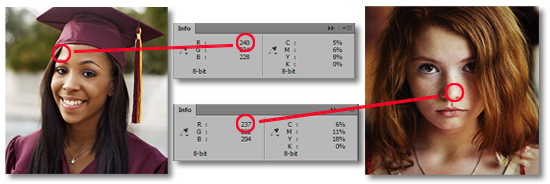
If you read higher than "240", you should reduce the exposure. If it reads lower than "236", then you should increase the exposure. This technique works across the whole spectrum of skin tones.
35. Clear the Field
Press the Alt key to make palettes and windows disappear. Press it again to make them reappear. Shift+Alt will do the same but leave the Tool Bar visible.
36. Take Control of Your Shadow
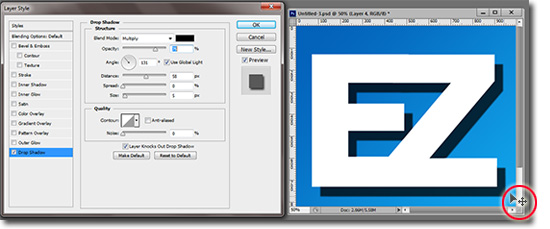
You can directly control the position of your shadows inside the image when using the Drop Shadow layer style. Just place your cursor over the image, left-click and hold to drag the shadow where you want. Press the Shift key to add the Snap effect.
37. Little-Known Layer Selection Shortcuts.
Sometimes it gets a little tricky to get layers in exactly the right place to nest. Check out these six keyboard shortcuts for layer selecton. Note that technically the keys that we label the < and the > are actually the comma and period keys. We thought that the arrows would be more intuitive and easier to remember.
- Alt + [ selects the layer below the current selected layer
- Alt + ] selects the layer above the current selected layer
- Alt + < selects the bottom layer
- Alt + > selects the top layer
- Shift + Alt + < selects every layer betwen current selected layer and bottom layer
- Shift + Alt + > selects every layer betwen current selected layer and top layer
38. Find Midpoint Gray Without a Gray Card
Forgot your gray card and need to white balance? No worries. Creat a new layer (Shift+Ctrl+N) and select the Difference blend mode. Go to Edit>Fill and select 50% Gray. Create a Threshold Adjustment Layer and move the slider all the way to the left. Then slowly move it right until you begin to see some black appear. Use the Color Sampler Tool (I) to mark the spot where is located. Delete the newly created layers and there you have your midpoint gray.
39. Super-Handy Selection Shortcuts
- Ctrl+D deselects a selection
- Ctrl+Shift+D retrieves a lost or deselected selection
- Ctrl+H hides a selection but keeps it active
- Ctrl+Alt+I inverts a selection
40. Quick Image Open
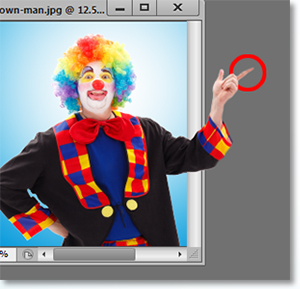
Double-click on the gray area outside any images to call up the Open dialog box.
41. Easter Egg
This tip will have to be classified under "useless". But it's a little fun, nonetheless. In CS5 or later, go to Edit>Preferences>Interface. Click on one of the four color themes while pressing the Shift+Alt+Ctrl keys. We will leave it a surprise as to what happens.

42. Easter Egg 2
In any pro version of Photoshop, press the Ctrl key and go to Help>About Photoshop.
43. Create Your Own Custom Keyboard Shortcuts
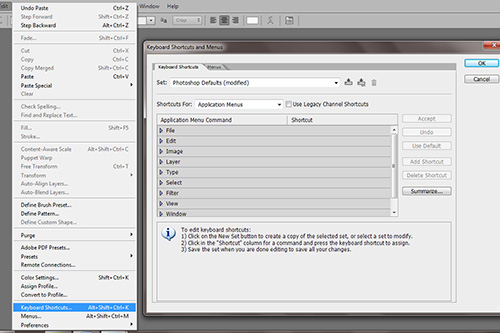
Press Alt+Shift+Ctrl+K to bring up the Keyboard Shortcuts Dialog Window and a list of functions and tools with their default keyboard shortcuts. Click on the desired function and press the keys that you want to be your customized shortcuts. Click “accept” and there you have it. You’ve created your own customized Photoshop keyboard shortcut.
Click here for an expanded version of this tip.
44. Record every edit you've ever made within the image itself.
When you close your image, you lose your entire history of edits. Photoshop allows you to record your edits within the metadata of the image. Go to Ctrl+K to bring up the Preferences dialog box. At the bottom of the window and check the History Log box. Choose "Text File" and "Detailed" and you will have every edit with it's exact settings listed within the image file.
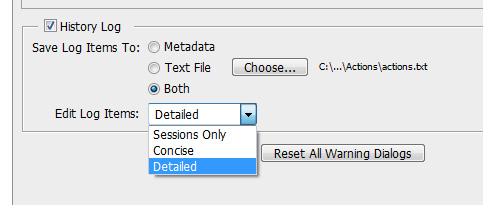
View the data by going to File>File Info..>History.
Click here for an expanded version and other options for this tip.
45. Open as Smart Objects by default.
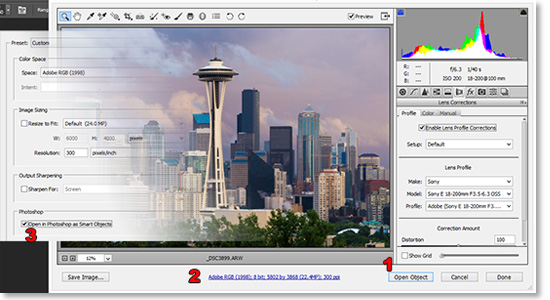
In Camera Raw, you can open an image by pressing the Shift Key when opening a raw file into Photoshop.
You can make this the default setting for all of your images opened in Camera Raw by clicking on the blue image link at the bottom of Camera Raw and checking the box marked "Open in Photoshop as Smart Object.
46. Create a "stamp" of your image.
If you want to see the result of an effect to your entire multi-layered image, you need not duplicate and merge all of your layers. Simply press Shift+Alt+Ctrl+E to create a "stamp" or single layer of your entire image. It will be the top layer and it won't affect your other layers at all.
If you want a stamp of only some select layers, then press Alt+Ctrl+E while your desired layers are selected.
47. Quick skin softening technique in Camera Raw
I love the Clarity slider, but it's usually not a good idea to crank it up in portraits. However, sliding it down to the negative numbers, will do a moderate skin smoothing.
Best use this technique when only a little work is needed. Otherwise, you would do best to use the Frequency Separation Technique.
48. Black & White adjustments directly from the image.
When converting an image to black and white (Image>Adjustments>Black & White or Alt+Shift+Ctrl+B), make adjustments directly from the image by clicking-and-holding to drag left or right to make adjustments from a specific color.
This option also exists on the Adjustment Layer by clicking on the hand icon with arrows next to it.
49. Liquify Faster!
Using the Liquify Filter can take a lot of resources. Changes can be sluggish. Make a lower resolution version of your image and edit that one. Within the Liquify dialog box, click the "Save Mesh" button. Then go to the full-size image and open it in the Liquify Filter and apply the mesh to the larger image. Voila!
Another trick is to create a selection if you only need to apply Liquify to a specific area and then the filter will only affect that area.
50. Using the Fade function for more exact edits.
When applying filters and other functions, I like to go to the Fade function (Edit>Fade or Shift+Ctrl+F). Pull the slider back and forth to find just the right spot. Sometimes, if I know that the I will be using the fade filter, I will overdo my adjustment knowing that the Fade will bring it back.
51. Quick Zoom
When you are in tight on an image, press H and hold to zoom out with a click. You can reposition, click again and zoom in the new position. This is a useful tool when doing detail work.
52. Paste to a specific point
Position your pastes anywhere you like by creating a selection with any of the selection tools. A quick drag with the marquee will do the trick.
53. Preserve color while using Curves
Applying curves adjustments can have an effect on the hue and saturation of certain colors. To avoid this, change the blending mode to Luminosity and your colors will stay true.
54. A quick cheat for sharp corners on a stroke
Until Adobe puts a "sharp corner" option on the stroke layer effect, simply apply the stroke to the "inside" of your selection rather than the default "outside".
55. Max Power and beyond
Ever feel like you just can't get enough Clarity (or other effect) on an image when you're in Camera RAW? Crank that slider up (or down) to 100! You're maxed out right? Nope. Just use a new Adjustment Brush and crank it up to 100 again. Now you're at 200! Want to do it again? Go for it!
BTW, it works in Lightroom too.
56. Bypass Camera RAW
"Get it right in the camera" is a mantra every photographer should repeat before taking every shot. Of course, almost all images need some sort of adjustments. But, for those rare occasions that you don't need to edit a RAW file, just go to File>Open and find your desired RAW file, press-and-hold Shift, then double-click over the icon to open it directly into Photoshop.
57. Dial in your fonts
There's no need to scroll from Arial to Verdana. Just highlight the fonts list and type in the letters of your font until you see the one you want.
58. Quick Background Unlock
When you need to unlock your Background Layer, just click and hold over the padlock on the right of the layer and drag it to the garbage can. A click saved is a click earned.
59. Don't break your wrist, give the image a twist
When you are drawing on an image, sometimes the angle can get awkward. Simply preess the R key to drag the image temporarily to an angle that is more comfortable from which to draw. You can bring it right back to its original position.
That’s all for now. We hope you learned something. Stay tuned for more EZTips in the days to come.
Stay updated with all our new releases and articles by signing up for our free email updates. We only send emails once a week to keep you updated and we NEVER spam or share your information.
