White Balance in PS and Gray Cards
White balance is basically getting the white part of an image to look white. Different light cast different colors. Our brains automatically compensate for these light casts much better than present day technology. So, sometimes we need to give auto-settings a manual nudge. Here is how to do it in Photoshop.
In The Camera
If you are not familiar with color temperature, your best bet is to put your camera on automatic. Even in lower-end cameras, the auto-white balance works more often than not. It’s usually only in a mixed light situation that any problems occur.
In higher end cameras you will be able to custom set it manually before you ever snap a pic. Every camera is different, so refer to your manual. A gray card is usually required for truly accurate customization.
The Gray Card
An 18% gray card is a valuable investment. First, they are very cheap; rarely over $20. Shoot the gray card every time the lighting conditions change. I usually just have the model hold it. This will take the guess work out of it. Particularly if your monitor is not properly calibrated which, by one recent study, is the case for over 80% of professional photographers.
In Photoshop Elements
As in all the forms of Photoshop, it’s pretty easy to get the white balance right in Photoshop Elements. But, as is oftentimes the case in Elements, it’s a little easier to make an edit a bit more difficult.
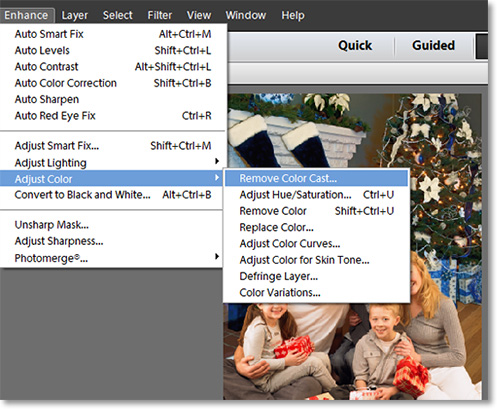
So, simply go to Enhance>Adjust Color>Remove Color Cast and click on either the white, middle gray or black area of the image to correct the color cast. I find myself clicking all over scenic images just to compare the different results. Again, if you have a gray card, you ensured an accurate color cast.
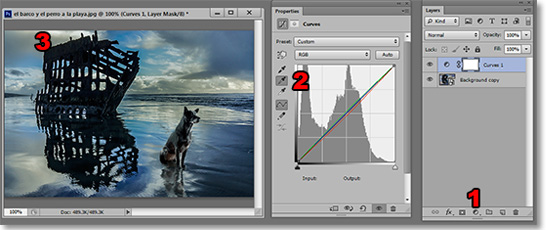
In Photoshop CS through CC
The easiest way to adjust white balance if you are shooting jpg is to use the Curves Adjustment Layer. If you’re not familiar with adjustment layers, check out our article on the subject here.
Click on the Create Adjustment Layers Button at the bottom of the Layers Window (1). In the resulting dialog box, click on the middle gray eyedropper at the left side of the window (2). Find the gray point in your image and click on it to see the image adjust (3). Much like the Elements tool, you can experiment with different points. Did I mention a gray card?
In ACR Photoshop RAW
If you shoot in RAW (as you always should), you can do the same thing. The advantage here is that you can apply the adjustment to multiple images without creating an action to do so.
If you don’t shoot in RAW format, you can still call up the RAW Editor. Go to File>Open As and then change the Open As file to Camera RAW, then click all the images you want to edit within a folder and press OK. This will give you access to the RAW Editor Interface even if you are shooting in JPG.
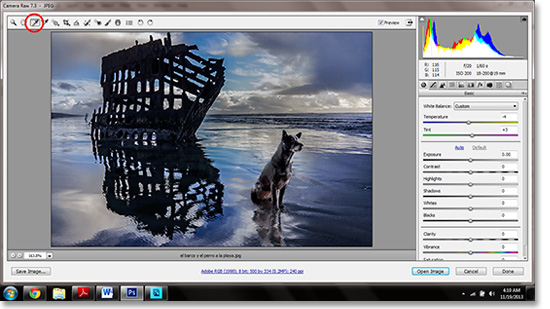
It’s just as easy here as it is in the others. Click on the eyedropper at the top of the editor and find your gray point again.
In Photoshop CC Only
There’s a great new feature in the CC version of Photoshop. Now you don’t have to do that “Open As” method anymore. You can even edit a single layer in the RAW Editor by right-clicking over it in the Layers Window and selecting Convert to Smart Object. Then press Shift+Ctrl+A to bring up the RAW Editor. This doesn’t help for batch processing, though.
If you would like to learn more about Smart Object, read our article here.
No Gray Card?
There’s a little-known way to find the middle gray in your image without a gray card. It’s so simple we covered in our EZTips and Tricks list. Check out number 38.
Stay updated with all our new releases and articles by signing up for our free email updates. We only send emails once a week to keep you updated and we NEVER spam or share your information.