Color Adjustment Layers in Photoshop
In our continuing mission to explore all things regarding layers in Photoshop, we will examine the Color Adjustment Layers available in professional versions of Photoshop. Our previous articles on layers editing are available in our Table of Contents for articles and on the right column of this page as well.
Color adjustment layers have the largest selection of option of all the adjustment layers sets. In Elements versions of Photoshop, the Hue/Saturation and Photo Filter are the only options available. However, color balance adjustments can be done in the Levels adjustment layer which is present in the tonal adjustment layers.
The common traits of adjustment layers and masks apply to the color adjustments as well. You can view our article on those subjects in the right column or by clicking on the links in the previous sentence.
Vibrance Adjustment Layer
The first adjustment in the drop-down menu is the Vibrance adjustment. There are only two sliders; the Vibrance and the Saturation.
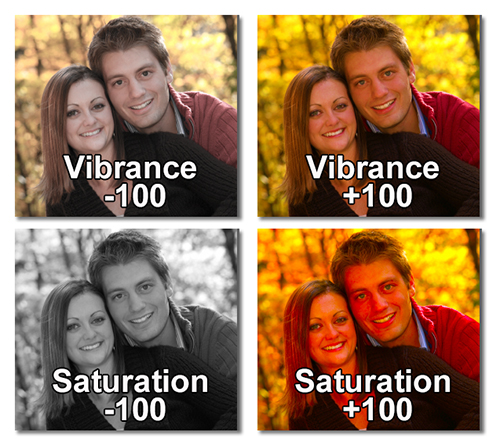
The difference between the two is that Saturation just goes for it. It will keep saturating your pixels to clipping and beyond.
Vibrance is a bit more restrained. It avoids clipping colors and because of that, it is almost always the best slider to use in a portrait. Skin tones can start to go over-the-top real quick in Saturation.
The image below illustrates the difference between the two. Notice that bringing the slider down to zero in Vibrance does not get rid of the color within the image like the Saturation slider does when the same adjustment is applied.
Hue/Saturation Adjustment Layer
The next layer down is the Hue/Saturation Adjustment Layer. Within the editing window you will see a set of presets within a drop-down menu. At the top-right (1) there is the option to load and save the presets.
Below that (2) is the option to edit directly in any particular color channel depending on your color profile. For the purposes of this article, we will be using the most commonly used RGB profile. If you are not familiar with color profiles and color balance, you may want to read our articles on that subject.
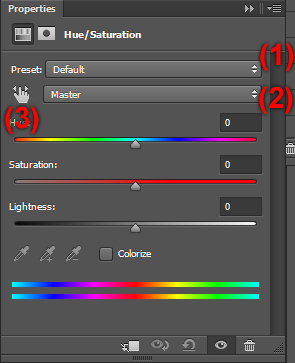
The on-image drag-to-edit function (3) is available in the Hue/Saturation window. Instead of viewing edits while adjusting sliders, you can edit directly from a particular point in your image. This can be useful when needing to make adjustments to a specific portion of your image.
There are some keyboard shortcuts associated with Hue/Saturation editor. While using the on-image hand adjustment, click on the icon (3). To adjust the hue slider normally, press the Ctrl key while dragging your cursor across the image. To make broad adjustments within the hue slider, press both the Ctrl key and the Shift key simultaneously. To make fine adjustments, press both the Ctrl key and the Alt key.
With no key pressed, the on-image slider adjusts the Saturation slider. Pressing the shift key and dragging makes broad adjustments, and pressing the Alt key makes fine adjustments in Saturation.
The Lightness adjustment slider is also available even if it is a bit of overkill. Lightness can be better edited in the tone adjustment layers. And since the Saturation slider is also in the Vibrance adjustment layer, the only real practical editing feature in this adjustment layer is the Hue itself.
Color Balance Adjustment Layer
The concept of Color Balance deserves a bit more explanation than a section within an article, so we wrote an expanded article on the subject which you can view by clicking here.
Color balance adjustment works with whatever color profile you are using. A quick glance at the available basic color profiles is viewable in Image>Mode. As usual we are working in RGB mode. There are neither presets nor on-image adjustments available here. Just the red, green and blue sliders along with the Preserve Luminosity check box.
Black and White Adjustment Layer
The conceptual understanding of the Black and White Adjustment Layer is beyond the scope of this article. In the following paragraphs, you can expect to understand what features are available and where you can find them within the adjustment layer window. A detailed analysis of creating a black and white image using the Black and White adjustment layers will be forthcoming shortly.
The presets drop-down menu is included within the adjustment window (1). They are intuitive, so playing around with them can help to familiarize you with the effect of each preset. And there are also the Save and Load options available in the drop-down menu at the top right of the window (2).
The on-image drag adjustment is also available in this adjustment indicated by the hand with the two arrows on either side (3). Click on that button and you can make your adjustment directly from the image instead of from the sliders. Pressing the Shift key while dragging will produce broad adjustments, whereas pressing the Alt key will fine tune the adjustments.
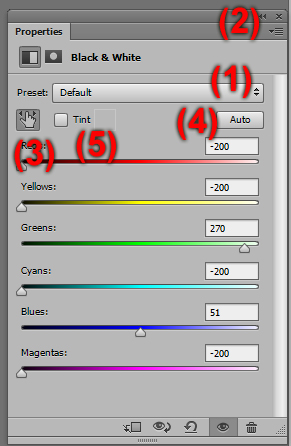
The slider will adjust the color most prominent within the pixel over which your cursor is placed. This can either be helpful or cumbersome depending on your desired edit.
There is also the Auto button which lets Photoshop give an educated guess as to your intentions (4).
There is also a Tint checkbox that you can create a color cast such as sepia (5). Simply check the box and choose your desired tint within the color picker.
Photo Filter Adjustment Layer
This is a fairly straight-forward application of color to your image. You can select from the presets or your own selected color. There is a slider to adjust the intensity and a Preserve Luminosity checkbox to ensure that the tonal balance of the image is maintained (a good thing).
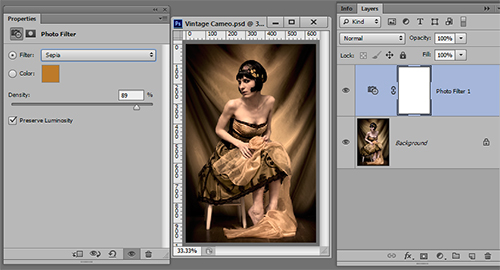
Here is an example with a sepia tone applied.
Channel Mixer Adjustment Layer
The Channel Mixer Adjustment Layer is a good example of the redundancy within Photoshop. Have you ever watched a tutorial and thought, “That’s not how I do that”?
For almost any effect, there are numerous ways to attain said effect. The fact is that anything that can be done in this adjustment layer can be done elsewhere. Whether or not the Channel Mixer is better or not than other options is up to you.
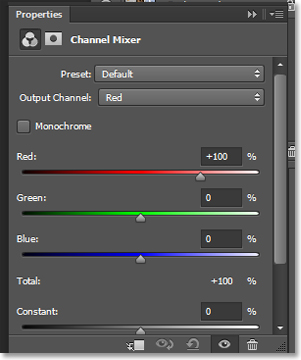
There are presets available. They are all black and white channel adjustments. The Channel Mixer is primarily used to convert images to black and white. This is done by checking the Monochromatic box. When done so, the Output channel will read gray. Otherwise it will read whichever color you choose. The default is red.
The Constant slider adjusts the grayscale index of the image in relation to the color adjustments.
Color Lookup Adjustment Layer
This is primarily used by video editors. It looks like a bunch of presets with different file extensions, which it is. But they are color presets intended to be applied to each frame and the adjustment layer itself is more intended to be a tool to apply 3DLUT file extensions created outside of Photoshop. If this doesn’t make any sense to you, then you don’t likely need this tool. If it does make sense to you, then you need a tutorial that covers this adjustment layer in more detail.
Having brought you through all of these color adjustment layers, I can confidently say that almost anything that can be done in these adjustment layers can be done more easily in the Curves Adjustment Layer. However, these may be more intuitive and quick for simple edits than jumping into a curves adjustment.
Final Tips
I'm going to end here with a piece of advice that has helped me numerous times over the years. If at all possible, do not send your final product out just after you have edited it. Take a breather, walk away from the computer or, better yet, get a good night's sleep and come back to your work.
By "sending your work out", I mean delivering your final product to its end- or next-in-line user. Whether that's a client or a printer or your neighbor; that's your end user.
The reason is that your eyes will interpret color differently when strained. This effect is more pronounced in men, but it certainly affects women as well.
Sometimes you have to put your images out there right when you finish editing. In those cases, if you don't have a third party available whose opinion you trust, then trust your instruments. This means your histograms and checking with automatic functions.
Stay updated with all our new releases and articles by signing up for our free email updates. We only send emails once a week to keep you updated and we NEVER spam or share your information.


